Talkin’ Tools ~ CNC Machines

Talkin’ Tools ~ CNC Machines

carbidNomad

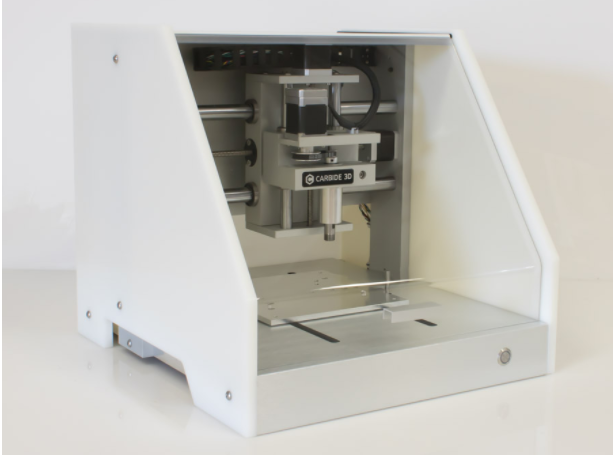
Nomad 883 Pro by Carbide 3D

I thought this to be an appropriate time to resume my Talkin’ Tools segment and share my experience with the addition of a new tool I have been using, a CNC (Computer Numeric Control) Machine.

Almost a year ago, I purchased the Nomad 883 Pro made by Carbide 3D. In doing so, I joined a fairly large community of people who use these in their work.

IMG_4080

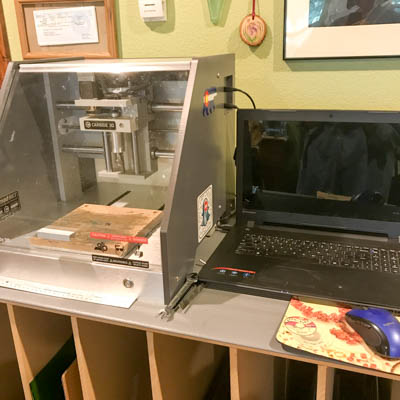
This is how I have the machine set up in my studio.

Why did I feel the need to acquire this piece of equipment? I am happy to report that the demand for my work started to increase over the past couple of years to the point where I needed to consider hiring an intern or finding another way to streamline my process. I opted for the latter and chose to purchase a milling machine.

Why did I purchase a CNC Machine?

  • I felt I could let a machine do one of the mundane, time consuming parts of my fabrication process which is cutting shapes using a jeweler’s saw. In this case, the machine does that work roughly 5 times faster than I can. This frees me to focus on the more creative aspects of what I do.
  • It gives me a repeatable process to consistently produce base items while I work on designs, finishing work and fabrication.
  • I didn’t have to hire someone and deal with that type of overhead.
  • I can utilize my computer skills when creating the files needed to communicate with the machine to do the work.
  • With the machine, there is less metal waste than when I cut pieces by hand. As a result, it provides more efficiency not only with my raw materials but again, my time.

Why did I choose the Nomad?

  • High rankings from a number of independent reviews.
  • Carbide has a great support team. I reached out to them with questions before I purchased the machine and was favorably impressed with their knowledge, support, and commitment to ensuring people would make an informed decision prior to purchase. They answered what I considered to be tough questions. Their philosophy is they want people to be happy once the machine arrived and was set up. They want that positive feeling to continue as people use this tool.
  • Carbide has a great user forum for all of their machines.
  • Reliability, which I can attest to after running it since last October.
  • Price. Milling machines can start at around $1200 and go up over $5000 for laser cutters. Early in my search for a machine, I did find one that was specifically designed for jewelers with a price tag of over $20,000! That was not something I could justify. However, the Nomad came in at roughly $2500, which was something that made sense for my business.
  • Self contained. Whatever material you cut, there’s always going to be a waste by-product. I wanted something that was enclosed to keep all the stray particles contained while the machine is operating. In the forums, I have seen some who further enhance Nomad’s enclosure system, but for my use, the machine’s cutting compartment works very well. I can reclaim the silver shavings to recycle them.
  • Desktop size. It’s footprint is 20″ x 20″. Weighs in at 65 pounds.
  • Work surface area is 8″ x 8″ which is perfect for me because the maximum size of the material I use (Sterling silver, copper or bronze) is 6″ x 6″.
  • Both Windows and MAC operating systems are supported
  • For additional specs on the machine, click here.

Things to know prior to the purchase of a CNC Machine

  • You are going to need to know how to use software that produces vector files. Some people use CAD programs. I use Inkscape, which is freeware and an alternative to Adobe’s Illustrator. Both of those programs work great with the Nomad. Inkscape runs beautifully on my MAC, has tons of user support, documentation and YouTube videos to get you up to speed quickly. It’s probably the best freeware I have used.
  • Most machines have what I would term proprietary software that convert the vector files of your designs into machine language to control the tool (thus the reason they are called Computer Numeric Control machines).
  • Nomad comes with two proprietary software packages: Carbide Create and Carbide Motion.
    • Carbide Create (CC) uses the vector file I generate of my design in Inkscape. In CC, I enter parameters about the type of material (generally sterling silver), the type of cutter (end mill), the depth of the material being used, and create the tool paths for the cutters to follow, which result in the shapes I use in my work.
    • Carbide Motion (CM) uses the machine code I generated with Carbide Create. CM connects to the machine and provides the instructions on what it needs to do.
  • I have a dedicated lap top that is always connected to my Nomad. Carbide Motion runs on that lap top and that is what controls the machine’s operation. You could opt out of a dedicated lap top, but I do not think you will find it convenient to constantly connect and disconnect a computer from any milling machine.

As with anything, there’s always a bit more involved that just buying the equipment.

  • In this case, you need to have a stable base for the machine to sit on. Fortunately, I had particle board storage bins that my husband and I built. Now I have re-purposed one of them for my Nomad.
  • The company also recommends that the machine sit on an anti-fatigue mat to help with noise dampening. The machine is very quiet when it runs; it almost has a pleasant, melodic tone as it works.
  • Unless you have a spare lap top or are willing to use an existing one, you will need to invest in a computer that will be used to communicate with the machine. The software that runs on that computer is what provides the machine code needed to cut your design shapes out of your material.
  • End mills, these are the cutters and engravers that the machine uses. Given the nature of the work I do, I have two go to end mills that I work with. My favorite supplier of end mills is Precise Bits.
  • Lubrication oil. The machine needs occasional light lubrication on its moving parts.
  • Cutting fluid. For the end mills that I use, the manufacturer recommends their cutting fluid to not only extend the life the end mills, but to hold the debris that is generated during the cutting process. Using this fluid also has the added benefit of reducing the amount of clean up I need to do with my machine after each run.
  • Shop Vac. This is more of a nice to have, but I already had a small 5 gallon shop vac. It’s necessary for me to vacuum up any of the super small particles that I do not capture in my first clean up.
  • Adhesive wax. Carbide sells two kinds of wax; each secures your material to the working surface. The blue formula is difficult to remove, but I have found some remedies. The white formula is water soluble and is my preference.

After purchase support

  • AWESOME. I cannot say enough great things about the support I have received through Carbide, although I did not need much when it came to the machine itself. The primary support effort came from a wonderful technician who wanted to ensure I understood how to get up and running with the software. That happened within 3 weeks of the two of us working together and making modifications to my files. I now have a repeatable process and my Nomad is the true work horse in my studio when it comes to cutting my standard shapes.
  • The Carbide 3D Forum. So much knowledge exists in that forum. If you can’t find a topic that has already been discussed, open one. They have also tied in a knowledge base in Wikipedia; while this features Carbide’s Shapeoko, plenty of this information relates to the Nomad too.
  • The Carbide channel on YouTube is a wealth of knowledge too, in addition to other Carbide users who post videos there.

The world continues to change and evolve, so too do the ways in which we work. Remember what was life like before personal computers, mobile phones, on demand videos, etc? From my perspective, as a jewelry designer/maker, in order for my business to grow, I needed to take this step. I am extremely happy that I made this investment in my company. I have also found more and more jewelers are using CNC Machines; they are just another tool in our arsenal that allow us to be more productive and spend quality time on the creative part of what we do.
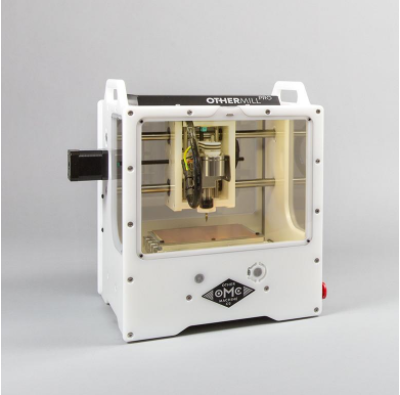
The Runner Up

The Othermill made by the Other Machine Co. Initially this machine was going head to head with the Nomad. It was quite the horse race. I must say the Othermill is a great machine with a strong support forum, blog, and great support staff who will readily answer questions. The reason I didn’t select this machine is that its work surface (5.5″ × 4.5″) was too small for my needs. At a minimum, because I usually work with 6″ x 6″ metal sheets, I just didn’t feel its work area would support what I needed. It was also a little higher priced than the Nomad and given the specs for each of these, I ultimately decided that the Nomad was a better choice for me.

OtherMill

In summary, I can not emphasize this enough….DO YOUR HOMEWORK. If you are considering the purchase of a CNC Machine, please research, compare, look for those independent reviews, and ask questions. No one understands what your requirements for a CNC machine are better than you, so understand how you intend to use the machine. This is a substantial investment and you want to be happy with your choice. I can assure you I am extremely happy with my choice and heartily recommend the Nomad 883 Pro.

Until next time, I continue to aspire to be more as an artist and a person.


Talkin’ Tools – The Band Saw

DSC07916

Last summer, a good friend suggested that I purchase a band saw. He said it would help my efficiency in the studio because I wouldn’t be using my jeweler’s saw to do some of the more tedious tasks associated with jewelry making. It made a lot of sense to me so I started to do some research. After a lot of comparison shopping through Harbor Freight, Lowes, Home Depot, Sears and more, I decided on this Mini-Band Saw from Micro Mark.

Once it arrived and I started using it, I found many applications where it saved me a tremendous amount of time and effort over sawing by hand. If you visit Micro Mark’s product page, you can see all its options plus watch a video of it in use. As an added bonus, it is currently on sale for $275.55.  No I don’t get any type of a rebate for referring you to this; it’s just a happy circumstance that I chose to write about this today.

If you opt for adding a band saw to your tool arsenal, whatever make/model you choose, you will need to secure it to a bench for safety and stability. I have mine screwed down to the top of my Black & Decker Workmate. This is a powerful machine. Respect that there is a blade moving that can easily cut through your fingers like it does steel. Eliminate all distractions while you are operating equipment like this as your focus needs to be on what you are doing. Always wear ear & eye protection when operating. It has a vent where you can hook up a shop vac to collect any of the dust from cutting. I use a 5 gallon shop vac with it, which allows me to avoid wearing dust masks. However, I’m sure some would argue that I should wear the dust mask while using it too. I agree you can never be too safe when it comes to your personal protection when operating electronic equipment.

I would also add as a caution that if you have visitors in your workspace or children, always disable the power source to this machine when it is not in use. My philosophy is an ounce of prevention is worth a pound of cure and heart break. If there is a way to avoid injury, find it and use it.

As I lubricant for the blade, I use Brownpolymer that I purchased through Enjen Joes Products out of Fulton, NY. This stuff is great and you only need a very small amount.  I tend to use it on the blade before I start and also apply it along the line on the metal where I will be cutting. A little goes a long way. Really any blade lubricant you have will work. I had read some positive comments about this Brownpolymer product, so I wanted to try it and I’m glad I did.

DSC07917

Here are some examples of metals I have cut with this. Steel, brass, copper, silver, square steel rod for tools. The specs on Micro Marks site tell you its cutting capacities for a specific material.

DSC07918

You can purchase additional accessories. The rip fence is very useful for maintaining straight cuts. I also got extra blades with different teeth per inch (TPI) for use with a variety of materials.

I do love my tools. The purchase of a Mini-Bandsaw has been a great investment for my studio. I can avoid some of the mundane sawing I use to do and spend more time doing some of the hand crafting of a piece where that effort pays off in the way a finished item looks and feels. Well worth the money in my mind.

If you are considering a bandsaw, I recommend doing your homework and finding a model that will work for your needs. I am more than satisfied with this powerful and mighty mini bandsaw.

Until next time, aspire to be more as an artist and a person.

Talkin’ Tools – Pitch

pitchExamples300

As a follow up to the last segment of Talkin’ Tools, I thought it would be important to discuss a few of the pitches I use.

IMG_0842

Pitch is the material that is used to support your metal as you move it into the shape of your designs using the Chasing and Repousse technique.

It comes in three consistencies: soft, medium and hard.  There are a number of commercial pitches available.  I have only used three types pictured at the top of this post:

  1. A special blend black virgin tar, made only by Il Maestro Fabrizio Acquafresca
  2. German red pitch
  3. Green pine rosin based pitch by Debra Montgomery

As I explored the different pitches available, I found the standard German black and red through retailers like Rio Grande, Otto Frie, Metalliferous and others.  As I like to say, Google is your friend when searching for materials and tools.  Some are what I refer to as ‘special blends’ created by teachers like Il Maestro Acquafresca, Debra Montgomery, and others.  I have discovered, as with most things I have learned, I tend to favor what I used in a workshop setting…..however……read to the end and find a surprising turn…..

Unfortunately, the black tar blend I used in Fabrizio’s workshop is only available through Fabrizio.  The only reason I prefaced that with “unfortunately” is because you can obtain this through him via his workshops (limited number in the US per year) and I think he may ship it to you, but it is heavy and international shipping….well, not much fun for this.  On the bright side, I have been told and so far it has been my experience that with proper care, your pitch can last a lifetime.  I think it is my personality to find alternatives along with being curious about others, so I decided to explore what might be available.

For the work I do, I have found a medium consistency to be a good, all around pitch.

So let’s get started.

Fabrizio’s special virgin tar pitch.  One of my favorites, because this is the pitch I used in Fabrizio’s workshop.  As you would expect, it has a very STRONG tar smell when heated.  Proper ventilation is very important.  My ideal is to heat and burn off this pitch outside given my studio set up.  However, living in Colorado, that is not always a practical option for me, which is another reason why I have explored and used other pitches.

DSC07875

Safety is of primary concern when using any pitch.  I wear these gloves anytime I work with this pitch or any of the other ones.  The picture shows the front and back of the gloves.  The dotted pattern is the palm side.  I think they are garden gloves that you can find at Walmart, Home Depot or Lowes….other places too.  They appear to be a heavy cotton canvas with some type of rubbery dots on the majority of the surface.  The important thing here is that you need to wear some form of hand protection when you heat ANY pitch.  It will literally burn your skin off if you touch it when it is in its most liquid state.  Fabrizio was extremely adamant and strong with his warnings about heated pitch.  I too feel it is that important to stress the need for extreme care and caution when working with any of these pitch materials.

gloves

Moving metal in this black pitch is wonderful. As with any of the pitches, you have to wait til it has returned to the right temperature before you begin your work. Fabrizio recommended testing for proper work temperature by placing the back of your fingers lightly against the metal seated in the pitch. If it is warm but not hot enough to make you want to move your hand, you are good to go. I have found an exception to this rule when working with the green pitch, which I will discuss in a bit.

If you have the opportunity to take one of Fabrizio’s workshops, buy the kit (which includes the pitch block that sits on a plywood base), purchase his chasing tools….including the small set and see if you can buy an extra pitch block.  Generally he only has what is needed for each student in the workshop.  However, if you can get a message to him through the facility where the class is held, do so and see if you can acquire an extra pitch block as a back up.  Just be prepared that you need excellent ventilation when you work with it and there’s just no getting around that tar smell.  Great workshop, awesome instructor, wonderful concepts and techniques, coupled with the tools of the trade that he has worked with and created over 30+ years.

IMG_0861

Red German Pitch.  This is a really nice, all around medium consistency.  I got this through Rio Grande.  It comes in a ‘brick’ that you have to break up and place in the pitch bowl to heat in your oven at a low temperature.  Rio recommends heating slowly, 250 – 300 degrees F.  It is one of the few pitches that you can put in your oven to melt the pitch in the bowl for the first time.  The bowl is cast iron, manufactured by Grobet.  If you can find a Grobet pitch bowl, don’t hesitate to buy it.  Wonderful quality.

DSC07876

The red pitch has a very mild aroma when heated.  You don’t have to burn off the residue from your work, but I have when it doesn’t respond well to being removed by acetone.  It is not as malleable as Fabrizio’s black or Debra’s green pitches.  However, the ease of accessibility and less noxious fumes makes it a great pitch.  I am certain if I had not learned the technique in Fabrizio’s workshop, I would be very happy working with this pitch.

Debra Montgomery’s Green Pitch.  I discovered this pitch through Nancy L T Hamilton’s blog.  I LOVE this pitch.  Debra makes it using a pine rosin.  It is so environmentally friendly, coupled with being great for moving metal.  I cannot say enough good things about this pitch.

DSC07877


Now you cannot heat this green pitch in the oven.  Debra provides tons of information with the instructions, along with plenty of details on her Chasers-Pitch website.  And if you have some questions, send an email and she gets back to you right away!

DSC07872

This pitch comes in chunks so I didn’t find a need to break it up for heating it in the pitch bowl.

DSC07857

This is the pitch bowl (cast iron pie plate) that I purchased for the green pitch.  I found this at an online company, Wasserstrom Restaurant Supplies.  That link will take you directly to the pie plate I purchased.  You can also look for cast iron plates at thrift shops, Walmart or other online stores like I did.  The reason I got this plate is  I couldn’t find the nice Grobet pitch bowl any more.  Debra does recommend that you make some modifications if you use something like this as your pitch bowl.  I did try to weld the bar, as recommended, for this new bowl, but I wasn’t successful.  So far, I have not experienced any issues with the pitch pulling away from the sides, so maybe this bowl is shallow enough to not have the problem.

Again, since you cannot heat this green pitch in the oven, rather than using my torch, I used a hot plate I have in the studio.  Please, please, please remember that anytime you take a kitchen item into the studio (the hot plate in this case), that becomes its new permanent home.  You cannot safely return those items back to the kitchen for use in  food preparation again.

DSC07873

I kept a careful eye on this and it melted quickly.

DSC07874

I have a heat safe surface adjacent to this so with the gloves and potholders I moved the pitch to that area to cool down.  You can work material in this pitch at a slightly warmer temperature than normal.  I still use the back of my fingers to feel how warm the metal is before I begin my work.

This picture shows one of my cuffs that is ready for chasing.  Also note that because this is not a normal pitch bowl, you have to use something to act as a ‘damper’ for the bowl to sit on.  The material the bowl is sitting on is some left over rubber shelf liner.  I experimented with a couple of things before I found this works pretty well.

DSC07883


The convenience of using this green pitch is great.  I can use my heat gun rather than my torch when I prepare it for use or just re-heat it once it’s too cool.  It liquifies quicker than the red or the black; again that is just with the use of my heat gun, not the torch.  It does have a lovely pine scent.  It is pretty easy to remove from your metal; I find with each new pitch I have a learning curve on how to correctly work with it.  I just gotta say, I am super impressed with this pitch and I highly recommend it.

To order the green pitch, you can find it at Chasers-Pitch.  I did get Debra’s eBook with my first order and have thoroughly enjoyed it.

A Couple of Tips.

> Something I read recently was to apply a light coating of PAM to the surface of your metal that will be placed in the pitch.  This helps to prevent the pitch from adhering to your piece once you heat it to remove it from the pitch.  I find it works quite well, but go light with the spray!  I have just applied it to a paper towel and then rubbed that across the metal; you don’t want to use too much.

> Again, let me state that with proper care, your pitch can last a long time….maybe a lifetime.  What is proper care?

  1. Don’t overheat your pitch to the point where it smokes and starts to burn.  That will cause bad pitch segments and affect the outcome of your chasing and repousse work.
  2. When not in use, keep your pitch covered to prevent contamination by dust, animal dander and such.

Thanks for joining me for this segment of Talkin’ Tools.  I hope you enjoyed the read and more importantly, I hope I have given you some good information about the various pitches I use.

Until next time, aspire to be more as an artist and a person.

Talkin’ Tools – The Chasing Hammer

DSC07850

Chasing Hammers by Saign Charlestein

I am officially resuming my Talkin’ Tools segment.  For this one, I would like to share my experiences with Chasing Hammers.   There are A LOT of  chasing hammer manufacturers and I certainly cannot give a comprehensive assessment, however, I can provide my insights and opinions on the ones I have and use.

Last summer, I had what I considered to be a once in a lifetime opportunity to learn Chasing and Repousse from Il Maestro Fabrizio Acquafresca.  It was a great experience and ignited a passion within me for this technique.  I’m pretty sure the chasing hammer Fabrizio was using was one that had been handed down for generations.  It had that wonderful aged look from use and care.

This is the hammer that came in our kits.

DSC07839

Nice weight and it has rounded face.  I have discovered that I actually prefer a flat face because it gives me better striking surface. This picture shows the differences between a flat face and rounded.

DSC07837Text

It certainly is not a high end, quality chasing hammer, but it does the job and is great for getting a feel for the technique of chasing and repousse.  One thing that happened  during the 5 day workshop with Fabrizio is the head of this hammer became loose with use. Fabrizio fixed it with the well placed insertion of a nail as shown in the photo below.

DSC07842NailText
Now I will never give this hammer up for many reasons, but it is no longer my hammer of choice when doing Chasing and Repousse.

I have a variety of econmonical chasing hammers ranging from $15 – $30 is cost per hammer; I also have some high end, quality chasing hammers that I will discuss toward the end of this post..  The reason I have a number of the less expensive hammers is because they are a good all around hammer for working with stamps, punches, dapping blocks and forging metal, like creating the frames for my Treescape pieces.

This is the first chasing hammer I purchased when I began metalsmithing.  It came from Allcraft and is a solid hammer with many years of service in its future.  It was roughly $30 about 8 years ago.  The handle needs a bit of smoothing and a tip from the workshop was you can use the edge of a piece of glass to gently smooth the handle.

DSC07838

Pictured below is another chasing hammer I purchased through Thunderbird Supply during one of their overstock sales.  It is heavy and very solid.

DSC07840

One thing you will find with the less expensive chasing hammers is the quality of wood used isn’t as nice, they are not as well balanced for hammering and the handle shapes are not as well defined.

You’ve probably noticed that all these pictured have a bulbous end.  That is designed for comfort and to help with how you grip the handle.  It reminds me of instructions I received when playing tennis; grip the handle like you are going to shake hands with it.  Not too tight, a nice gentle and relaxed grasp.

DSC07852

Place the ‘bulb’ end in the palm of your hand.

DSC07853


Wrap your fingers around the bulbous handle with a gentle grip.

Drum roll please.  My indulgence in a great, quality chasing hammer came with my purchase of this one from Saign Charlestein, owner of SC Studios LLC.  It has 4 ounce head.  Perfectly balanced.  Higher quality Osage orange wood for the handle.  Superb craftsmanship.

DSC07844

You may think it is too beautiful to use, but that definitely isn’t the case.   You can find a variety of Saign’s hammers, chasing tools and tutorials on his website, Metalsmithing-Tools.com.  The design of the handle and the wood Saign uses is such that it allows for the correct movement/action when hammering.  This helps to prevent injuries that can occur with repetitive use of the hammers in metalwork.   Trust me, you want the hammer to do the work, not your body.  Correct grip, use your wrist.  This hammering technique is one best learned in a workshop or by watching videos put together by people like Saign or Fabrizio.

As with any tool, proper grip and technique are imperative for achieving the desired result.  At the end of the workshop with Fabrizio, he told me to keep hammering.  Practice is the key to success with anything.  I try to hammer every day, but that is not always possible with my schedule.  I will say that when you have a quality hammer, like the ones Saign produces, they do help you to develop the correct hammering action.

Remember posture is just as important.  Don’t hold the handle with a death grip as that will not only fatigue your hand and arm, but will result in your body absorbing some of the ‘shock waves’ from the hammer blows.  Gently grasp the hammer in your hand.  Move your wrist in action with the hammer usage.  It should be a nice flowing action.  For chasing, your work surface should be at chest level which requires the proper chair height and work table.  I am more comfortable when I sit more upright and do not hunch over my pitch while chasing.

This Christmas, I treated myself to the purchase of a set of Saign’s hammers.  I wanted the different weights so I could select the right hammer for working with my designs.  The lightest head here is 2 ounces for detail and texture work up to 3.5 and 4.5 ounces to get the job done.  These have become my work horses for the designs I create.

DSC07846


Now you may wonder what size is right for you.  It just so happens that Saign posted a video discussing Chasing Hammer Sizing on this past Tuesday.  Please take a look as he does a great job answering the question.

Could I find comparable hammers for less money, no doubt.  Would I be as happy with them, I really don’t think I would.  In this case, my opinion is you get what you pay for.  I have a number of Fretz hammers.  They are truly beautiful.  I love the Fretz texture hammers I have.  However, the head on my Fretz chasing hammer  is loose.  In part, because I live in Colorado where it is very dry and the wood shrinks.  I’ve heard of a number of solutions, but I’m not comfortable trying any of them, so the Fretz hangs on my peg board above my bench.  I can tell you that it does not have the weight or balance the Saign’s hammers do.

DSC07843

I also have a wonderful selection of N C Black Hammers and I am extremely happy with them; however, to my knowledge they do not make a chasing hammer.  If they did, I’m certain I would be very happy with the quality of theirs based on my experience with the others I have.

These are Japanese chasing hammers.  They look quite different from the others mentioned so far.  They are small in design to fit with the smaller, lighter Japanese chasing tools and chisels.  I do enjoy using these.  Their hammering action is quite different from the others, but I find them great for applying textures.  They also have flat hammer faces.

DSC07851

Ideally, if you can ‘test drive’ a hammer before purchasing it, that’s the best route to go.  Everyone’s hands are different and some may fit you better than others.  I’ve been pretty fortunate with the selections I have made.

For more information on the topic of Chasing and Repousse, some resources I frequently use are

When you have the right hammer and practice practice practice….the joy of moving metal into beautiful shapes is absolutely magical.

AspenCuff

This is one of my latest Aspen cuffs.  I think the reason I enjoy these so much is the Aspens in our back yard have served as my models.

I hope you have enjoyed the return to Talkin’ Tools.

Until next time, aspire to be more as an artist and a person.

Welcome 2015!


Screen Shot 2015-01-06 at 8.20.51 PM

Celebrate 2015

There’s an exhilaration with the start of a new year.  The anticipation of what the year holds in store for us and what changes we may make in our own lives.

One of the first things that Dan & I did to celebrate the arrival of 2015 was to have an Art Date.  We went to see Brilliance: Cartier in the 20th Century at the Denver Art Museum.  What a treat.  It took a little over 2 hours to see the exhibit of Cartier’s work.  A feast for the eyes and a delightful glimpse into some of the past eras where tiaras where the norm for the wealthy, fanciful tributes to Egyptian artifacts as people were caught up in the excitement surrounding the discovery of King Tut’s tomb, wonderful timepieces, and stylish cigarette cases when smoking became the fad to name just a few of the highlights.  While I don’t even come close to working with precious gems and the type of clientele like Cartier did, I do have an appreciation and admiration for the designs, works and craftsmanship.  If you live within a 100 mile radius of Denver or even a tad further, I think it is well worth the trip to see this feast for the senses.  The exhibit runs through the middle of March 2015.

IMG_1192

The jeweler’s desk is very messy.  It has to be that way.”  How true!

I think this bench at the exhibit is one of the most photographed by those of us who are jewelers.  I have an ongoing battle with the state of my bench.  The more the creativity flows, the messier it gets.  However, it reaches a threshold where I have to clear and re-organize.  Yet I find this quote such a wonderful affirmation.

As I’m looking at this bench, it is a confirmation of my thoughts at the end of 2014 that I needed to resume the Talkin’ Tools segment of my blog.

Talkin’ Tools Revisited

A number of years ago I started a segment called Talkin’ Tools.  To this day, those posts generate the greatest number of visitors to my blog.  My first post was on the purchase of a KnewConcept saw.  However, the idea for this actually came from my husband, Dan.  We were talking about one the most popular posts I had; it was related to the purchase of my Cliff Carroll anvil, which I called 35 lbs of Pure Metalsmithing Joy.  Dan suggested that I have features where I discuss my experiences with the tools I use.  From that, Talkin’ Tools was born.

The idea for tool reviews had been on my mind, because of my frustration with the lack of independent reviews on jewelry making equipment.   I wanted to provide helpful information about the equipment I use in my studio.  With the continued visits to that post on the anvil, it was as if people were telling me to write reviews.  So I did for a couple of years and then it lost momentum with me and I stopped writing my evaluations.

After seeing this work bench at the Cartier exhibit, I felt like it was time to revisit sharing my experiences.

In conjunction with that, I would also like to introduce you to a fellow metalsmith and friend, Melissa Muir.  Some of you may already know her, follow her blog, enjoy her Tool Time Tuesday posts and YouTube videos.  If not, I encourage you to get acquainted because Melissa freely shares her knowledge and skills, along with her evaluations on jewelry making equipment and how to use them.  I think our respective blogs are a nice compliment to each other.  Plus we both want to help others with the information we share in our posts.  Here’s a link to Melissa’s latest Tool Time Tuesday where she discusses bench shears vs guillotine shears.  Check it out, I think you will enjoy it.

So stay tuned because Talkin’ Tools resumes on Friday, January 16, 2015.  My topic will be chasing hammers and how I use them for Chasing and Repousse work.

Know that I will continue to share my experiences in this fascinating world of metalsmithing.  Please join Melissa in her journey too.

Until next time, aspire to be more as an artist and person.

Blog-o-Sphere Think Tank: What’s your Favorite Tool?

The Trusty Foredom Flex Shaft

Today’s topic for our Blog-o-Sphere Think Tank is “What is your Favorite Tool?” The subject was not limited to the tools we use in our respective studios.  There were many that came to my mind.

To qualify as one of my favorite tools, the tool must be practical and functional.  My dad taught me the importance of good tools.  So my narrowed down list ranges from my Chi flat iron (in purple of course!), to my NC Black Hammers, to the pooper scooper (yes, I know eeeiiiiwwww, but when you have doggies, it’s a necessity!!!), to my Husqvarna Viking sewing machine….yet, I kept coming back to my trusty Foredom Flex Shaft!

It’s hard believe that I acquired this tool in October of 2009! I was so overjoyed with it then that it became one of the topics for another blog post about tools. As much as I truly do enjoy the zen of hand finishing my metalwork, I find I go to my Foredom almost every time I work at my bench.  Why?  Well it has a multitude of attachments that make metalsmithing even more fun for me.  It’s a great time saver since I feel I need to make the most out of the time I work in the studio.  Here’s a list of a few of the things it does that makes my life easier when metalworking:

  •  Drilling holes is a breeze
  •  It can perform quick sweep, with the right attachment, to rid the metal of a scratch that could take 10 – 15 minutes or more of hand sanding
  • Adding a bit of texture to the metal with one of those 3M ‘spiders’ (radial sanding discs)
  • Smoothing out a bump in my soldered bezel wire
  • Removing a spot of solder that would take a while with hand sanding
  • Giving an polished edge to a finished piece with additional smoothness and shine

I truly love tools that make my life easier and this is definitely one of those.  It goes to the head of the class and I have found using it invaluable in my studio.

Now lets see what my fellow blog-o-sphere think tankers shared on this fun topic! Please visit their blogs and enjoy the read.  🙂

Andes Cruz: http://www.andescruz.wordpress.com
Shannon I’m On A Roll Koochin: http://thebassplayersdaughter.blogspot.ca
Barbara Donovan:  http://barbaradonovan.blogspot.com/
Robyn Hawk: http://flyviewsandreviews.blogspot.com/
Beth Cyr: http://bcyrjewelry.blogspot.com
Natsuko Hanks http://jewelrybynatsuko.blogspot.com/
Christine http://sistinachapel.blogspot.ca/
WATTO (Mary) http://www.wattoonline.com/news
Wendy Kelly http://www.wendykianakelly.com
Stephanie Clark http://thethinkingsofacoldweathergirl.blogspot.com

Until next time, aspire to be more as an artist and a person

Talking Tools ~ Magnagrip Knife & Utensil Holder

One of my favorite things is to find something that is functional and helps keep my bench organized. This is the 18″ Magnetic utensil holder made by Magnagrip. I have attached this to the side of my bench. It is very handy for holding some of the tools I use frequently. Plus it helps to eliminate clutter on my work surface.

It was a gift from Lexi for my birthday, along with a number of other practical items that I absolutely love.

I had been looking at this for a while, but never mentioned it to Lex. You can imagine my surprise when it was in my assorted birthday gifts from her!

It works like a charm. The magnet runs the entire length of the holder and is strong. It easily holds these tools in place. I did a quick web search to see who sells these and of course, Amazon came to the top of my search results. I think I have seen these locally at Bed, Bath and Beyond. Just one of those things that I never swirled at and bought for myself. Thanks again Lexi for adding this to my collection of items I love!

If you’ve been looking for something that works very well to hold some of your frequently used tools, give this a try. I think you will like it as much as I do.

Until next time, aspire to be more as an artist and a person.

Talkin’ Tools ~ Dapping Block and Punches


The punches

The matching dapping block

In today’s segment of my Talkin’ Tools post, I wanted to discuss my Pepe Dapping Block and matching punches.   These come in a variety of sizes and options.  If you are considering adding these to your tool kit, I would recommend buying them as a set.  I didn’t do this and while I believe I ended up with a slightly greater selection of sizes, the set is nice and seems to be a bit more cost effective.  The choice is yours and I provide links to a couple of suppliers at the bottom of this post so you can do some price comparisons.  As I always say, Google is your friend when hunting for bargains on the web, so feel free to do some additional searches if you want to purchase a a set.

The dapping block has a series of what I call reversed domes; I think another term used to describe them is ‘hemisphere’.  Each one of these semicircles has a corresponding punch that matches its size as I am showing in the picture below.

The correctly sized punch and hemisphere in the block are used in conjunction with each other to shape a piece of metal into a dome.  I’ve used this for shaping metal pendants and earrings.  Just remember that if you are making earrings, dome the metal blanks in the same time period, because the way you hammer can differ from day to day, hour to hour.  Shaping and texturing should be done at the same time when your body is in a given ‘zone’.  At least I have found that to be the case for me.

For the purposes of this post, I am showing an unfinished brass disc, because I didn’t have any completed and ready for this stage of the demonstration.  Normally, I would sand the metal’s surface in preparation for the texture I intended to apply.  Remember, you have to apply your texture first before shaping the disc in the dapping block.  Attempting to add texture once the metal has been shaped, well, that really doesn’t work well.  Do things in the correct order.  Think what step needs to happen first, because it makes your work so much simpler.

Place the disc in the block, finished/textured side down. Normally, the finished side is what you what to dome, however there may be time when you want to reverse things and mix it up a bit.  For the sake of this demonstration, I am placing the disc, finished side down.  From this view, the finished side isn’t seen, because it is face down.  The side facing you in this picture is the back of the metal blank.

You want to take the correct size punch, place it on top of the metal blank positioned in the corresponding hole in the block.  Ideally, you want the punch to be perpendicular to the semicircle in the block.  I like to use my chasing hammer, when shaping blanks in the block.  Several firm, strong hammer strikes on top of the punch end and your disc will be domed.  Practice, to see how your hammer strokes work in forming the metal to the desired shape in the punch.


Pin It

I formed the reticulated silver dome for this pendent using the Dapping block and punch.  I think a domed shape adds a nice touch to art jewelry.

As most of you know from my previous posts, I am a fan of Pepe tools.  They are strong, durable and a good value for the price.  If you would like a set like mine, I purchased them from Indian Jewelry Supply.  The 30 pc Dapping Punch set is Item Number 212-DPC30  The Cube block is Item Number 212-DBD  If you just want a nice matching set with a few less punches, they offer a set of 17, item number 212-DPS158  I believe OttoFrei is offering the 17 piece set too, click this link to their site for the product.  To receive an additional 5% off the purchase price, one of OttoFrei’s discount codes for the month of January is FRESH.

I find having the ability form metal with the dapping punches and block to be another way to add interest to your designs.  I’ve been meaning to try the punches as another way of adding textures to my work too.  Sometimes there can be more than one use for a tool.  I hope you enjoyed this brief overview.

Until next time, aspire to be more as an artist and a person.

Talkin’ Tools ~ An Organization Tip


Grumbacher Plastic Paint Mixing Tray

A long time ago, in a gallaxy far far away…..wait a minute, wrong tale!

Take two.  A long time ago, I tried my hand at painting. One of the items I hung onto from that artistic adventure was this paint mixing tray by Grumbacher.  As I was decluttering my studio a while ago, I found this and considered donating it so that someone else might be able to put this to use.  However, I did not and it sat in a little box….sort of looking at me.  Then I moved it to the top of my soldering bench, next to my pickle pot.  I still wasn’t sure why I felt the need to keep this aside from some emotional attachment, but I did.

So why am I posting about a Grumbacher paint mixing tray in my Talkin’ Tools segment?  Well, it turns out that it has become a very handy way for me to organize the components for my Ginkgo leaf earrings.  Sure, I could have gone out and bought something else, but this works and puts this tray back into use in my studio.  Saved a little money too!


Ginkgo parts

You see, when I make my Ginkgo leaf earrings, there are a variety of bits and pieces that go into their assembly. I need to keep them organized by earring style so as I start to put the sections together, I have the right part for the right design.  I work on one earring set at a time as I build them.  The dividers keep the sets together and I don’t run the risk of getting them mixed up.

Prior to utilizing this tray, I would have the earring sets scattered around in little piles on a table.  Speaking from the voice of experience, there were times when my sleeve would brush them and they would fall on the floor or get mixed together.  That was FUN, not!  These incidents left me with this time consuming and needless task of putting an interesting jig saw puzzle back together.  Talk about frustrating!

One day, as I was in this frustrated state, here’s this little tray, sort of smiling and winking at me now and I think, ok, I get it.  Put you to use.  I did.

Viola!  Once I started using the tray, the process was simplified. I can keep track of how many are ready by a glance. I’m assured that the right parts for the earring set are together. Once I fire up my torch, I can work on 8 pairs or more if use the small circles in the tray.  Even though I build them one pair at a time, I don’t like to start work on the assembly process until I have a batch.  I find it to be more efficient.

There are several key things I’d like to convey with this post:

  • Organization in the studio (and other areas of life) is very important. It helps simplify what you are doing, alleviates stress and frustration, along with speeding up what you are doing.
  • Be innovative. Look for items you may already have and see if they can be used for another purpose.  It may be a good fit and save you a bit of money.
  • Consider options.  Being open to alternatives that can help you with an immediate solution…it’s good to have options.

Have you found something that you use in your work that is an alternative use from its original purpose?

I hope you find this tip helpful and are motivated to start looking for things that may help you in your work.

Until next time, aspire to be more as an artist and a person.

Talkin’ Tools ~ NC Black Hammers

Check out my latest and greatest hammers and forming blocks from NC Black!

This past Sunday, I was able to attend a demo by Andrea Kennington & Les Bryant of NC Black, which took place at Cottonwood Center for the Arts in Colorado Springs.

As many of you know, I love tools.  I have wanted to explore some additional metalworking techniques ever since Annie of NC Black did some demos at our Colorado Metalsmithing Conference this past July.  Now I have what is considered a starter set of their mini forming tools and I will be practicing….a lot!

The techniques that I will be exploring and learning are called shell forming:   anticlastic raising and synclastic metal forming.

Michael Good is probably best know for his anticlastic work.  Betty Helen Longhi’s work shows more beautiful examples of the synclastic style.  For a good overview on these metal forming techniques, visit these Ganoksin links:

Right now I’m not sure how I will incorporate these techniques in my work.  I love  learning new things.  It is good for me to challenge myself and see how these techniques may be applied to my future works.

Andrea is one of my Facebook friends, so it was great to meet her in person.  She shared a number of things about herself and the company she formed, that added to my respect and admiration of her.

I would like to share a bit of Andrea’s story.  She apprenticed under Betty Helen Longhi and was a production jeweler for many years.  She would teach a few workshops each year.  For those workshops, she made the tools the students would need to use and those tools would be part of the student’s kit that they would take home after the workshop.  She said she never set out to make hammers.  She made a limited number of them each year for the workshops she taught.  But demand for those tools increased and she really didn’t have the time, people or facility to produce hammers.  That all changed….

When the economy took its toll on a few of her friends (they were laid off), that became the impetus for a partnership to form NC Black.  The tool manufacturing company started 31 months ago and  today employs around 18 people.  Impressive.

There is a direction that many artists in the United States are advocating and that is buy American made products.  Andrea is supporting that cause with NC Black, using steel and wood from the US.

Here are a few examples of the work Andrea and Les demonstrated for us.

I shot a few video clips so I can refer back to them as I practice.  I wanted to share this one as an example of one of the techniques they demonstrated.

Next March, they will be back in Colorado Springs at the Cottonwood Center for the Arts to teach a workshop and I am ready to sign up.  One of the encouraging things Les told us was that one could pick up these techniques in about 4 hours.  Now, mastery of them comes with a ton of practice.  We all have to start somewhere, right?

I definitely like the quality of their tools.  An added bonus for me is knowing the people behind the company.  It was a pleasure Andrea and Les!  Looking forward to spring 2012 when you return to Colorado Springs.  I am an eager student.

Until next time, aspire to be more as an artist and a person.